Time for an overhaul of my 1.9 '98 BMW Z3 Individual

Matt Barnes

Zorg Guru (II)
Supporter
British Zeds
Joined
Jul 18, 2020
Points
123
Location
Portchester, Fareham
Model of Z
1998 BMW Z3 Individual 1.9 M44 B19
I'm enjoying your thread and loving your attention to detail Matt, especially with the pad springs;) :thumbsup:
haha... cheers mate...I always took this whole thing on as a learning project rather than.. let's get this back on the road as a soon as possible...job..I'm very lucky to have three cars which allowed me to devote quality time in learning how to restore a car...
 

Matt Barnes

Zorg Guru (II)
Supporter
British Zeds
Joined
Jul 18, 2020
Points
123
Location
Portchester, Fareham
Model of Z
1998 BMW Z3 Individual 1.9 M44 B19
well......one step forward and then stalled..... CALIPERS !! ….. tried every which way I could to get the piston back out to re seat the boot but couldn't... tried fashioning different types of adaptors and hoses and nothing worked...…. then... I had an idea..... I am somewhat of a *ahem* hoarder. Kept lots of classic toys from my time as a kid in the 70s and 80s.... plus I never throw anything garage related away..... and today was a reason why !....

though I've not kicked a football for many years I knew somewhere I had a pack of pump adaptors. Many a drawer was rifled until I found them !.....

so the brain cell started ticking …. in the pack of brake unions I bought, I dug out one that fitted the Caliper.. M10 I think.... then (as it's plastic) wedged the pump adaptor into the end ….

1736605434731.png
1736605476050.png


1736605510435.png
1736605532617.png


then with a couple of pumps on the foot pump and POP !!!... out she flew !!.... (yes I re enacted it as you can see the piston is already out =)) )

1736606067812.png


I followed the video that @AntStark posted and can I get that ring into the groove ?... it's like trying to get an eel that has a lube fetish into a hole that he knows is certain death and keeps pushing back...… so at the moment I've taken 5 to gather my thoughts !


well after that little break i decided to have another go.... much wriggling, wrangling including coming up with creative names for the person that designed such a system...... we got there !! :party: .... two boots firmly seated home

1736609393759.png
 
Last edited:

Matt Barnes

Zorg Guru (II)
Supporter
British Zeds
Joined
Jul 18, 2020
Points
123
Location
Portchester, Fareham
Model of Z
1998 BMW Z3 Individual 1.9 M44 B19
Got there in the end:thumbsup:
it was doing my head in !!... every time I got about 5mm of lip in, I'd try the next bit and the previous bit would pop out... I genuinely thought I had the wrong boots and had to sanity check with the old ones that came off, which were the same.....
 

Matt Barnes

Zorg Guru (II)
Supporter
British Zeds
Joined
Jul 18, 2020
Points
123
Location
Portchester, Fareham
Model of Z
1998 BMW Z3 Individual 1.9 M44 B19
Ok so this morning was continuing to rebuild the calipers. Maybe due to the temperatures I found it far easier heating up the pin guide sleeves so they were nice and malleable

1736691008193.png


Smothered them in grease and fed them in Top hat side first, which I found FAR FAR easier than trying to feed the cone end in. By the time I got to the fourth one it was about 30 seconds to fit

1736691104047.png


For the pins, I struggled at first and then realised there was still paint on the threads of the bracket. Ran one of the pins through back and fourth which cleared the threads out. I took the option of installing the pins while the bracket was in place rather than fitting the pins first. Went in easy !
1736691215275.png


As you can see .. I work in strict laboratory conditions =)) =))

1736691271207.png


I used the Optimal High temp thread paste which I saw recommended on a Porsche site for brake parts.

1736691327309.png


Then it's just the case of connecting everything up... zinc plated bleed nipples and zinc plated carrier bolts... these will get boxed up until I'm ready to assemble the subframe !!

1736691437050.png

1736691455085.png
 

Matt Barnes

Zorg Guru (II)
Supporter
British Zeds
Joined
Jul 18, 2020
Points
123
Location
Portchester, Fareham
Model of Z
1998 BMW Z3 Individual 1.9 M44 B19
What paint did you use for the calipers @Matt Barnes ? I am inspired to have a go at rebuilding these crispy old ones off my 1.9
View attachment 326853
I used Silver Hammerite spray.......UPDATED with the one I actually used !

1736696504105.png


used the brush version at first but it looked too crude and you could see all the brush strokes...so ground it down to bare metal and sprayed them
 

Attachments

Last edited:

Matt Barnes

Zorg Guru (II)
Supporter
British Zeds
Joined
Jul 18, 2020
Points
123
Location
Portchester, Fareham
Model of Z
1998 BMW Z3 Individual 1.9 M44 B19
Decided I'm going to start rebuilding the Trailing Arms... and I have to admit I think I cocked up the heat shield.... all started well.... because I hadn't cut anything ! =)) =))

1737214471573.png


Thought a Dremel would be perfect for this with a metal cutting disc..... it wasn't :rolleyes:

1737214549778.png


It ended up chewing the metal up, so if you're going to replace your Heat shields without taking out the hubs, DON'T use a Dremel... stick to an Angle grinder with a cutting disc, or a junior hacksaw for a straighter neater line !

This is the Dremel one.. I painted the cut in Hammerite to stop the edges rusting, but.. if I can't make it look better I might have to get another one

1737214716248.png


So.... onto other things... tidied up the Hub and decided to use my current favourite black stone chip

1737214780992.png


1737214808357.png
1737214828565.png


yes it looks grey but it's just the light reflection..

1737214875249.png


Now then... long term viewers will remember me trying to get the driveshaft nut off one of the hubs which took abut 5 weeks in the end ! (that was August 23 would you believe !! )

anyhoooo this is the spline damage in the hub as a result of weeks of smashing the nut with a hammer and various chisels plus the help of @Alan Slade ...

I eventually got it off with a carbide milling bit on the Dremel to cut it off....

the damage (I think) is superficial, couple of spline ends chipped off but I can still get the driveshaft in it..

1737215118040.png


Thought I'd finish off by mocking up the refurbed calipers, zinc bolts onto the trailing arms... really happy how it's turning out

1737220591994.png

1737220618104.png

1737220638720.png
 

Attachments

Last edited:

Matt Barnes

Zorg Guru (II)
Supporter
British Zeds
Joined
Jul 18, 2020
Points
123
Location
Portchester, Fareham
Model of Z
1998 BMW Z3 Individual 1.9 M44 B19
well this morning was ... Back plate day......thought Id try @Kendo's theory of cutting the back plate and wrapping it round the hub... so here goes !!

first after a couple of tries I realised I was just going to destroy the paintwork, so stopped and taped up the cut edges

1737292775068.png


I tried being delicate, try to avoid any scratches, but unless you wrap the plate in foam, it's near on impossible. Managed to open it up enough, to sit over the hub an then you have to commit with a little shove

1737292888962.png


and just like that... it's on !!

1737292936298.png


I found that a 10kg tub of pothole repair tarmac a great counterweight for the Arm.. other options are of course available =)) =))

1737293039153.png


I did incur some "battle damage" but that was inevitable and only requires a touch up with the Hammerite...and I need to give the hub another light coat of stone chip
1737293169543.png


BUT.... it's on !.. and certainly easier that replacing the whole hub

1737293235684.png


Now for the slit ?... I might try a light layer of JB weld maybe ... don't know yet....

I tried putting on the handbrake support bracket but it wouldn't go in..... turned out to be the thickness of the Hammerite paint

1737293363571.png


so ground it off, made sure the hole in the hub was also clear of paint and it slid right in, put in the zinced back plate bolts and voila...

1737293426600.png


just need to rinse and repeat on the left Trailing arm... in the meantime, the Octavia VRS needs an MoT so my motivation might need to be diverted onto that ! :whistle::whistle:
 

Matt Barnes

Zorg Guru (II)
Supporter
British Zeds
Joined
Jul 18, 2020
Points
123
Location
Portchester, Fareham
Model of Z
1998 BMW Z3 Individual 1.9 M44 B19
well today I thought I'd push on with the Trailing Arms... put the dust shield on the other Arm as before and of course had to patch up the paintwork from the inevitable scratches. So... while that was drying I thought I'd start on the Trailing Arm brake pipes..

I looked back at photos of when I took the subframe off and tried to copy to routing, so did this...

1737821557958.png


and it just didn't look right.... so looked back on here to see other people's routing and then did some digging on the interwebs.... and it was clear the back lines had been replaced at some point and wasn't OEM routing !

So I started the fettling, this time having a go at my pipe bender which I managed to use properly this time.... and fashioned this

1737821748830.png

1737821889402.png


massaged it a little more by hand when in situ.... when was happy I trimmed the ends off with the pipe cutter, and then put the unions on and flared the ends.

1737821918279.png

1737821942770.png
1737821964757.png


yes it all needs to be clipped in that will pull it into the trailing arm, it's just swinging in the breeze at the mo

1737822056930.png
 

Attachments

Last edited:

Matt Barnes

Zorg Guru (II)
Supporter
British Zeds
Joined
Jul 18, 2020
Points
123
Location
Portchester, Fareham
Model of Z
1998 BMW Z3 Individual 1.9 M44 B19
Right.... today I thought I'll have a crack at the offside Trailing Arm... some things are still a bit awkward with the hub on.. but to do the plate bolts up was far easier using a hand extension though one of the wheel bolt holes

1738419280915.png


Then it was time to make up the offside Trailing Arm brake pipe in a mirror image to the nearside, without cocking it up....

1738419361972.png


and I did.....but... when trying to fettle the end that goes into the bracket, I managed to fold it... :whistle:

1738419434358.png


so that one had to be consigned to the bin and I started again...….

this time..... success.... the old one didn't want to leave so photobombed the shot... =))=))

1738419507423.png


Flared the ends

1738419570939.png


And there we are, both Trailing Arms now ready for brake hoses and hand brake shoes... oh.. and clipping in the brake lines

1738419655471.png


Now.. I need some advice if I may.... going to turn myself onto the Diff Bush.... as I don't have a press, I have effectively one shot at it...

is this the right way up for the Bush ?... I think it is...:whistle::whistle:

1738419759069.png
1738419801967.png
 

Matt Barnes

Zorg Guru (II)
Supporter
British Zeds
Joined
Jul 18, 2020
Points
123
Location
Portchester, Fareham
Model of Z
1998 BMW Z3 Individual 1.9 M44 B19
well today I thought I'd have a look at my dodgy outer sill and have a go at the Diff Bush..... I think I'm going to need your help again on this one...

right.. .sill first... as suspected, a previous owner decided to "glue" an end piece on with ..... body filler.... very nice..

1739101858184.png
1739101879402.png


then the inside, cleaned up a bit

1739101934157.png
1739101966085.png


getting it back to clean metal... I'd have to chop it at the line.... now it's about 1.2mm thick steel, so quite tricky to weld. Wondering if it's worth cutting my losses and getting another sill to paint ?.. don't know yet...

1739102915282.png


right.. the Diff bush.... had it in the freezer overnight.....next to the Beef Orlando..... =))

1739102148825.png


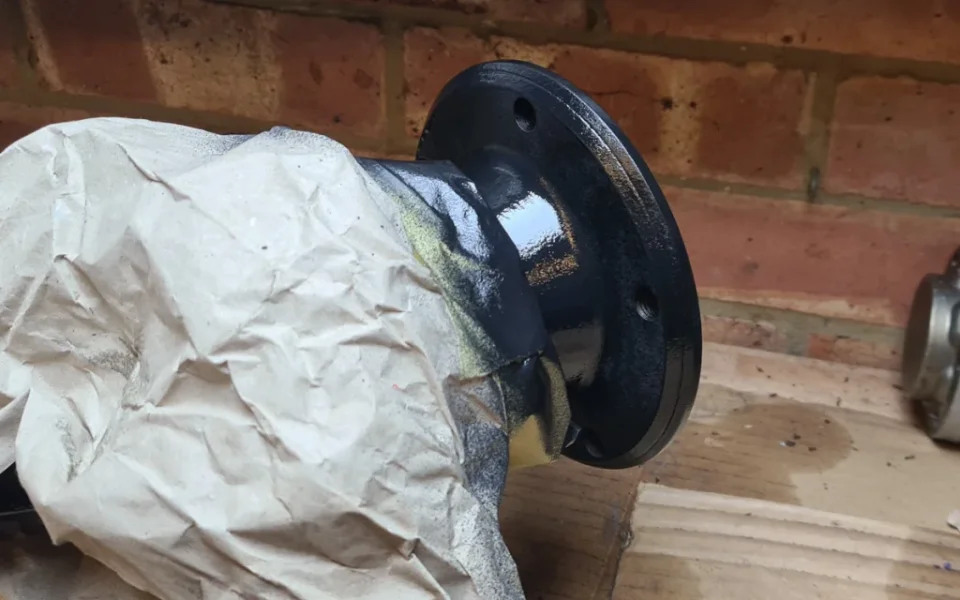
and this is where I ran into a problem..... first off, get your nice refurbished Diff plate...

1739102218493.png


and it was very sporting of Parkside in Lidl to supply a brass wheel which fits perfectly into the bush housing

1739102282081.png


now here comes my issue... that is not a small vice !.... it's a Woden vice with wood faced jaws. Now each time I offer the diff up, note it's perfectly square and it starts ok, looking underneath the entire ring is inside the bush opening

1739102403695.png
1739102438936.png


BUT, I get to about 2 turns in and it seizes solid, will not go in any further... i don't won't to put too much pressure on it in case the plate snaps in the vice.... anyone else successfully done this in a vice ?

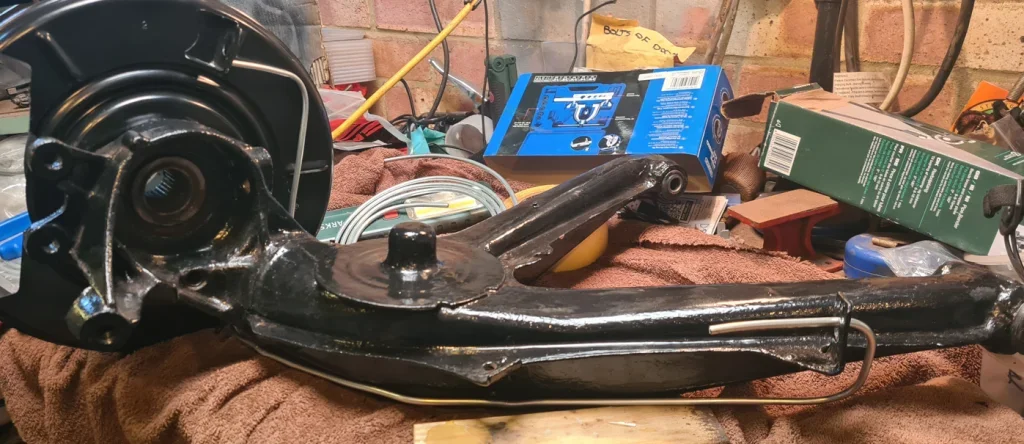
In the meantime, I thought I'd adopt the Mazza Method of trolleying the subframe to the car. however, my wheel trolley is too shallow for my Jack

1739102640865.png


so, some modification is required..... enter the pallet blocks and the rivnuts !! =))

1739102723969.png
1739102745164.png


et... voila !!!... perfect for the Jack and I can wheel the whole thing out to the car

1739102811606.png
1739102838437.png
 
Top