I've never bought a kit before so I can't be sure. Maybe some kit suppliers sell super accurate bodies with perfect gloss gel coat. Just bolt it on and voila, your car is ready to go. But I don't think that kit would be available at the 'tribute automotive" price. You get what you pay for.And yet everyone seems to pile on the praise for Tribute's skill and quality?
From what I've read and seen on here; they don't seem to be very good mouldings at all.
I just don't understand it.
It seems that the 'flat spot' issues are well documented (on here at least), yet Tribute haven't addressed them and still churn out mouldings with the same issues. Or am I wrong?

Rebody Mittaws 250 SWB Coupe Build
- Thread starter mittaw
- Start date
Dxbolton
Zorg Guru (II)
I only needed about 5mm depth of filler along the length, and there was a flat spot near the drivers headlight that needed filler too.Only minor? Mine (right side) is massive. I think it'd need a layer of filler over an area of 15x30cm around 15mm thick to 'round it off'.
Having said that - Looking at it from all angles though I'm beginning to think it isn't the top of the wing that's low. I think it's the area to the right (outer side) of the flat spot that bulges out kinda making the plateau. Sitting in the driver's seat looking over the wing I see a distinct lump sticking out. I'm reluctant to slap on a pile of filler when (maybe) I should be taking some GRP off
Steve needed loads of filler on his, so I wonder if it depends on how the moulds are initially bolted together??
By that statement you are effectively saying Tribute's panels are s*** but cheap, so that's OK. They are not that cheap!But I don't think that kit would be available at the 'tribute automotive" price. You get what you pay for.
Sorry but I don't buy into that philosophy, especially from a business who make and sell the stuff for profit. There are obviously some faults with their moulds. It would have been no more expensive for them to have made accurate moulds as to make faulty ones.
My issue is that no-one seems to want to hold Tribute to account for their inaccuracies. If they did, chances are Tribute would have made new, more accurate moulds by now; meaning less work and expense for the builders.
I look at the pictures posted above by @mittaw and see him re-building Tribute's panels and paying them handsomely for the privilege.
Dxbolton
Zorg Guru (II)
The DNA kits were 3 times more expensive. This would have prevented many of us from buying a kit in the first place if Tributes were the same.By that statement you are effectively saying Tribute's panels are s*** but cheap, so that's OK. They are not that cheap!
Sorry but I don't buy into that philosophy, especially from a business who make and sell the stuff for profit. There are obviously some faults with their moulds. It would have been no more expensive for them to have made accurate moulds as to make faulty ones.
My issue is that no-one seems to want to hold Tribute to account for their inaccuracies. If they did, chances are Tribute would have made new, more accurate moulds by now; meaning less work and expense for the builders.
I look at the pictures posted above by @mittaw and see him re-building Tribute's panels and paying them handsomely for the privilege.
it’s allowed lots of an entry into a great kitcar community and also lets us develop our own skill sets.
i could have passed the Kit to their agent to build for me, but the price of that is close to a brand new Z4. Horses for courses.
If you want a perfect car, buy one ready built.
I can’t imagine you’ll place an order any time soon.
I’m very happy with my purchase
I already have a kit thanks, which I was royally ripped-off for. Mine was bought from a dodgy little man (who thought he could make good money from sub-standard crap and actually did in my case) and had it sat in his back garden. So I have no recourse unfortunately.I can’t imagine you’ll place an order any time soon.
But you are right, I will NEVER do this again. I like to pay people money and receive a product which works first time (fit for purpose), not which will only 'work' after hundreds of hours of my valuable time and effort. Call me old fashioned. The kit car world is definitely not for me. Unfortunately I am tens of thousands of pounds into it, so it has to be for the foreseeable future.
")
Agree 100%, a turnkey car from Tribute agent is way in excess of what I was going to pay but in the end we build these because we enjoy it. If someone want a perfect kit/car there is the option to go and buy one.The DNA kits were 3 times more expensive. This would have prevented many of us from buying a kit in the first place if Tributes were the same.
it’s allowed lots of an entry into a great kitcar community and also lets us develop our own skill sets.
i could have passed the Kit to their agent to build for me, but the price of that is close to a brand new Z4. Horses for courses.
If you want a perfect car, buy one ready built.
I can’t imagine you’ll place an order any time soon.
I’m very happy with my purchase
I'm very happy with the kit I bought, and enjoy every minute of getting it looking exactly how I want it. After all it's the building that is actually the fun part as well as drivingit finished. ...i hope this is just the first one I do...
Anyway there is a risk of this thread going a little off subject as it's meant to just be lighthearted and a little help for those that follow.
That's a shame, sorry to hear that. Too many dodgy people aboutI already have a kit thanks, which I was royally ripped-off for. Mine was bought from a dodgy little man (who thought he could make good money from sub-standard crap and actually did in my case) and had it sat in his back garden. So I have no recourse unfortunately.
But you are right, I will NEVER do this again. I like to pay people money and receive a product which works first time (fit for purpose), not which will only 'work' after hundreds of hours of my valuable time and effort. Call me old fashioned. The kit car world is definitely not for me. Unfortunately I am tens of thousands of pounds into it, so it has to be for now.
I've just seen it looks like you're doing a Cali build. Id love to do one of those after this.I already have a kit thanks, which I was royally ripped-off for. Mine was bought from a dodgy little man (who thought he could make good money from sub-standard crap and actually did in my case) and had it sat in his back garden. So I have no recourse unfortunately.
But you are right, I will NEVER do this again. I like to pay people money and receive a product which works first time (fit for purpose), not which will only 'work' after hundreds of hours of my valuable time and effort. Call me old fashioned. The kit car world is definitely not for me. Unfortunately I am tens of thousands of pounds into it, so it has to be for the foreseeable future.
Don't!I've just seen it looks like you're doing a Cali build. Id love to do one of those after this.
Give me £25,000 (that's less than it owes me) and you can finish mine if you want!
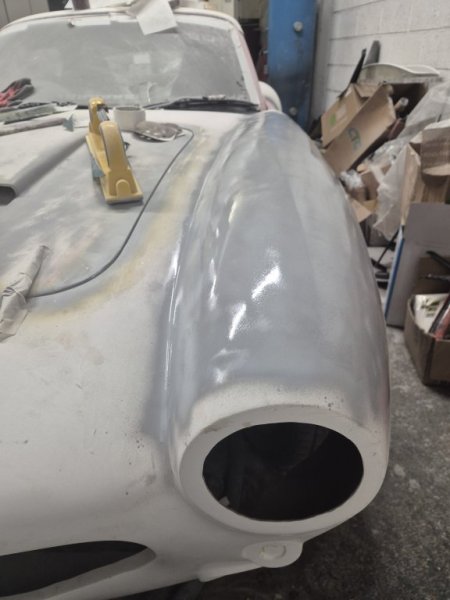
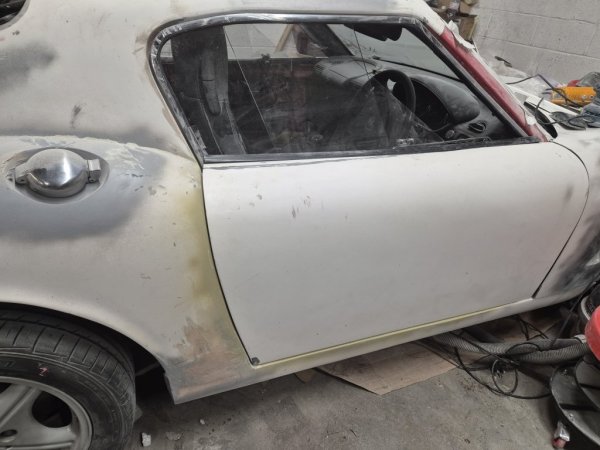
Ive got the front end to a rough shape that I can work with better. I've got rid of the factory flat spots/ridges and panel joins. I just need to get all long flat edge over them all to finish off shaping. I'll do that later as the windows are back from the chromers and I need to progrss with the door openings as its a big job and I need to start it.
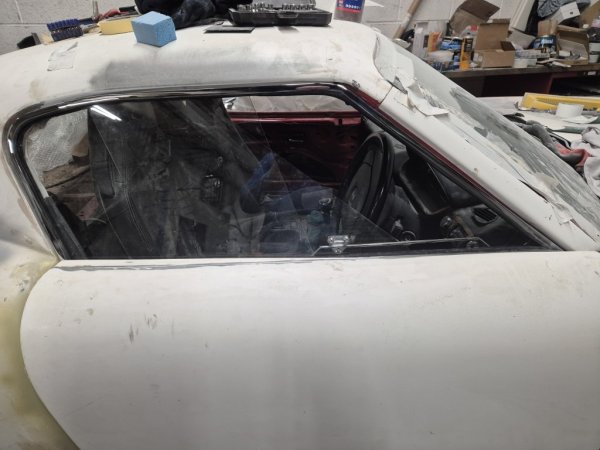
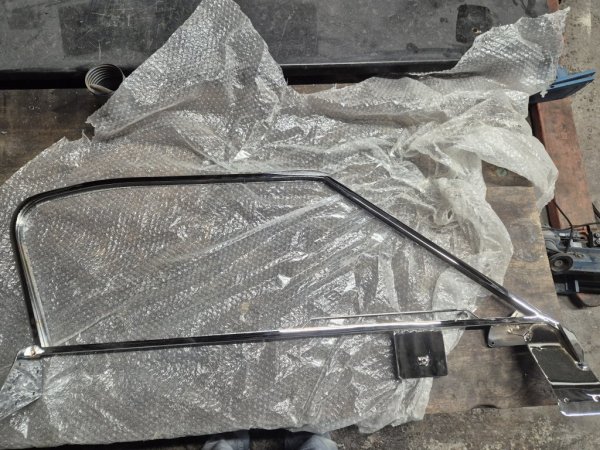
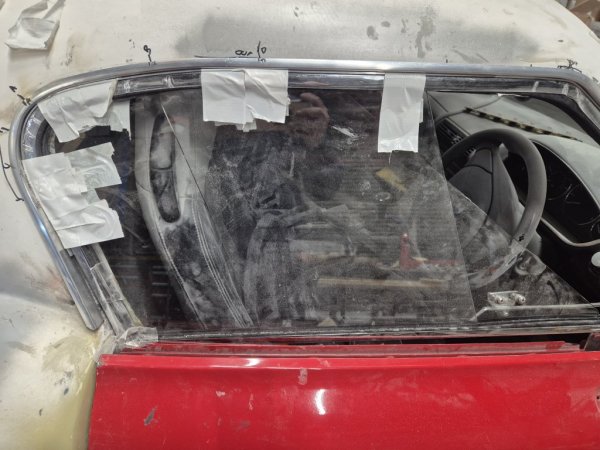
Windows look great. I'm about 98% comfortable with them. There are a couple of small areas where I suspect the original frames have made if tough to get perfect line on the chrome finish, but you'd have to look closely to to spot them, so I'm happy to get them on as they are for now. I want to create some bespoke stainless steel ones in the future so these will only be temporary for a few years. Which means while I'll bond the doors on it will only be a light bond and I'll rely of a series of rivet nuts for fixing. If the chrome starts to go or when I replace them I don't want to have to cut the doors off to change anything.
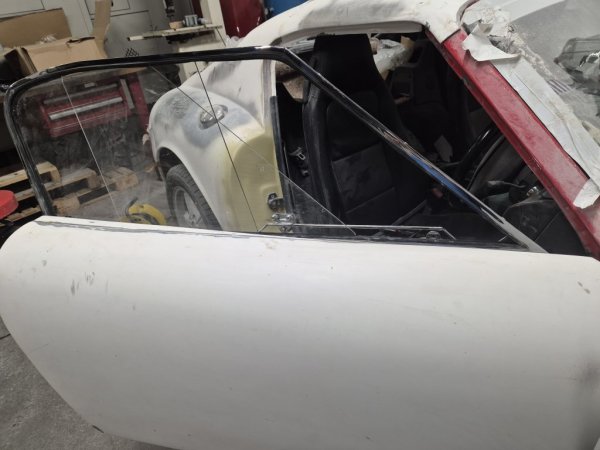
I have reconstructed the windows and installed for a dry fit so I can work out the door panels and gaps. Quite a but of work to do on getting the door edges flush with the body. I'm working on getting the door to shut with the skin on and clearances first. Once all these work ill work on bringing the body lines to match the doors for a dry fix.
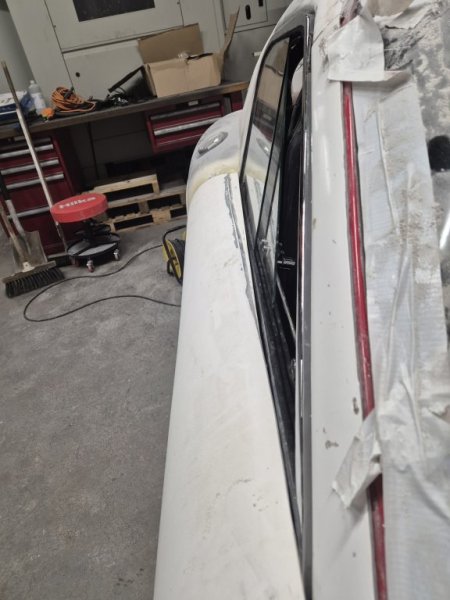
I may have to also bring the roof out slightly as even with a rain channel as the frames stick out just a little tad too much. I've pulled them in as much as I can with the window frame fixings but with a slim rubber door seal they still protrude just a little too much for my liking. Ill work up both roof lines once I have the doors aligned to where I want them.
I'm happy with the way the chrome windows fit and sit, I've also covered them with protective clear paint protection film for now...bit rough looking but will stop them getting scratched.
Next week to sort out both door fittings
Windows look great. I'm about 98% comfortable with them. There are a couple of small areas where I suspect the original frames have made if tough to get perfect line on the chrome finish, but you'd have to look closely to to spot them, so I'm happy to get them on as they are for now. I want to create some bespoke stainless steel ones in the future so these will only be temporary for a few years. Which means while I'll bond the doors on it will only be a light bond and I'll rely of a series of rivet nuts for fixing. If the chrome starts to go or when I replace them I don't want to have to cut the doors off to change anything.
I have reconstructed the windows and installed for a dry fit so I can work out the door panels and gaps. Quite a but of work to do on getting the door edges flush with the body. I'm working on getting the door to shut with the skin on and clearances first. Once all these work ill work on bringing the body lines to match the doors for a dry fix.
I may have to also bring the roof out slightly as even with a rain channel as the frames stick out just a little tad too much. I've pulled them in as much as I can with the window frame fixings but with a slim rubber door seal they still protrude just a little too much for my liking. Ill work up both roof lines once I have the doors aligned to where I want them.
I'm happy with the way the chrome windows fit and sit, I've also covered them with protective clear paint protection film for now...bit rough looking but will stop them getting scratched.
Next week to sort out both door fittings
Attachments
-
 58 KB Views: 45
 -
 115.9 KB Views: 46
 -
 76.2 KB Views: 47
 -
 104.3 KB Views: 40
 -
 42.8 KB Views: 41
 -
 124.2 KB Views: 42
 -
 259.2 KB Views: 40
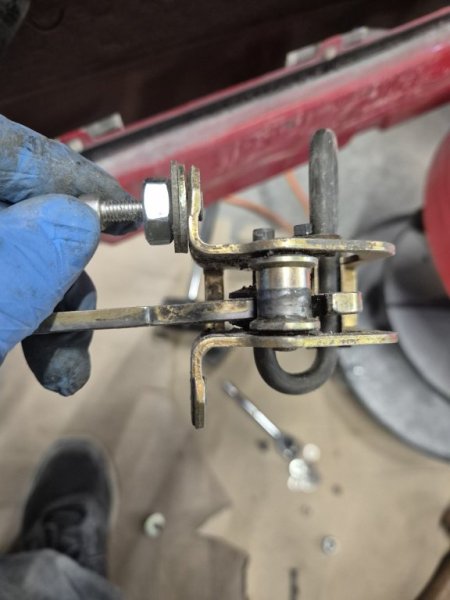
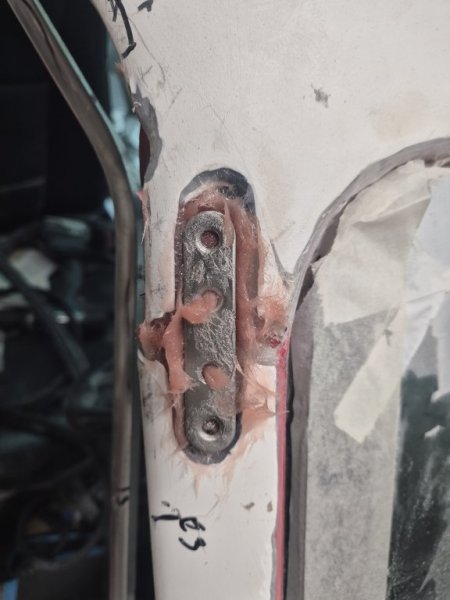
@mittaw Your bonnet hinges. External? Are they just temporary or will they be external when the car's finished? On the 507 kit the whole front body section attaches to the original Z3 hinges allowing the whole front section to be lifted. I think most of us building the 507 kit have just bolted the small bonnet panel to the body so it doesn't actually open. Eventually, though, I would like to be able to open the small bonnet panel so plan on fitting internal hinges from Mercedes A Class just like I did at the rear. Wouldn't those merc hinges work for your kit?
They are permanent hinges from Triumph TR4 rear boot. I was recommended them from another Tribute Coupe builder. My full front lifts up much like your 507 but I wanted access to the engine via the small bonnet. I thought about bolting it to the body panel but I thought if adding water etc it would be easier to have the small bonnet open.@mittaw Your bonnet hinges. External? Are they just temporary or will they be external when the car's finished? On the 507 kit the whole front body section attaches to the original Z3 hinges allowing the whole front section to be lifted. I think most of us building the 507 kit have just bolted the small bonnet panel to the body so it doesn't actually open. Eventually, though, I would like to be able to open the small bonnet panel so plan on fitting internal hinges from Mercedes A Class just like I did at the rear. Wouldn't those merc hinges work for your kit?
The TR4 hinges work really well because they have two bolts in each section which gives good strength over the ones with only one bolt in one of the sections..
I don't know about the merc internal hinges but the TR4 hinges I use bolth straight to the GRP body so don't need any structural fixings etc.
Plus I wanted the bling on the front bonnet to give the look.
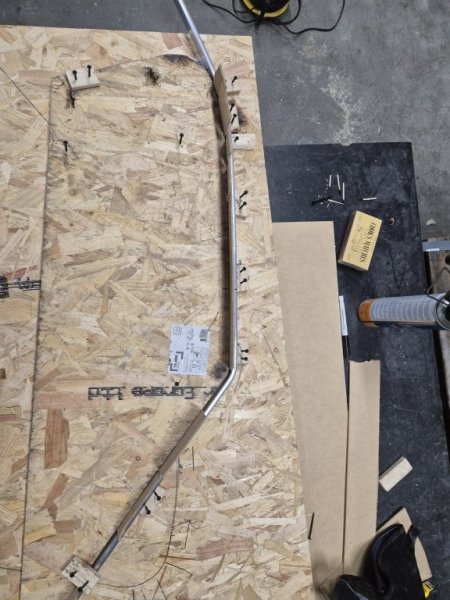
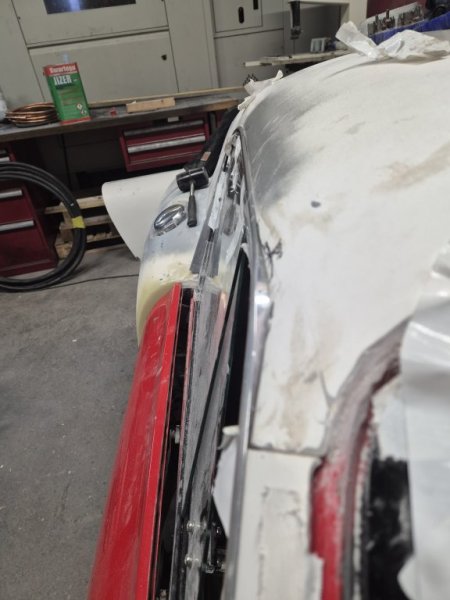
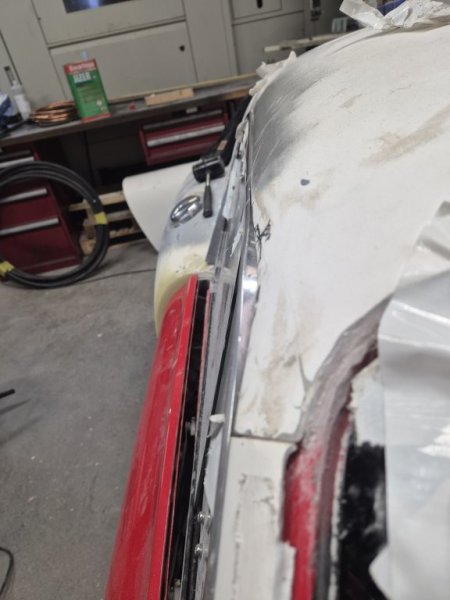
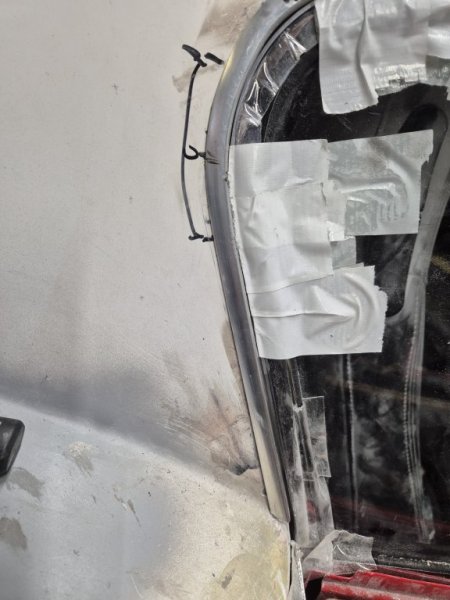
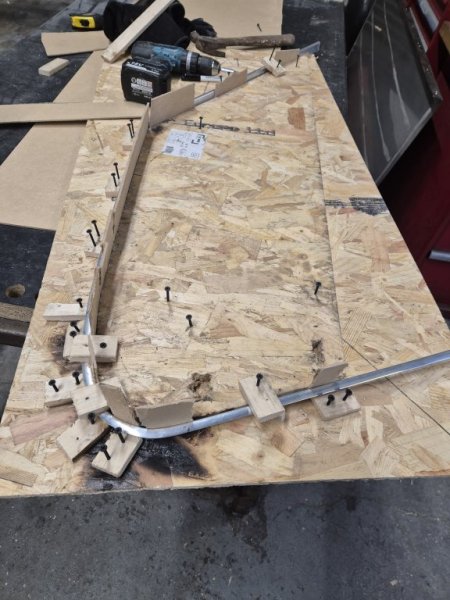
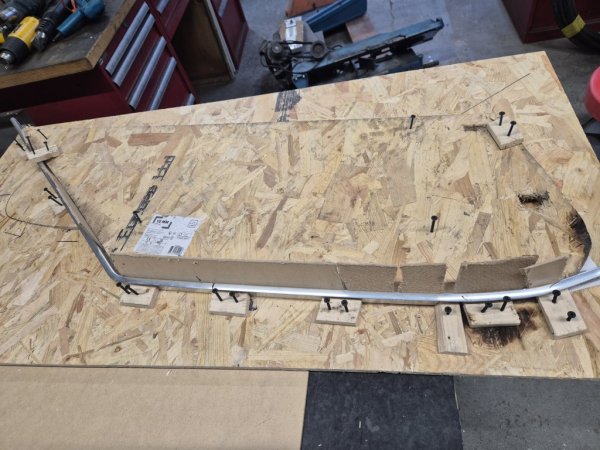
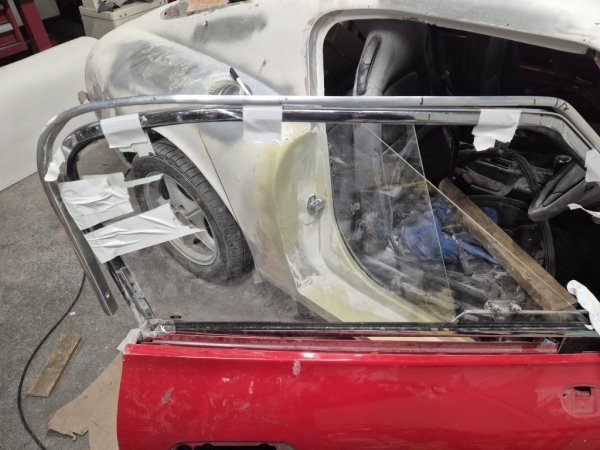
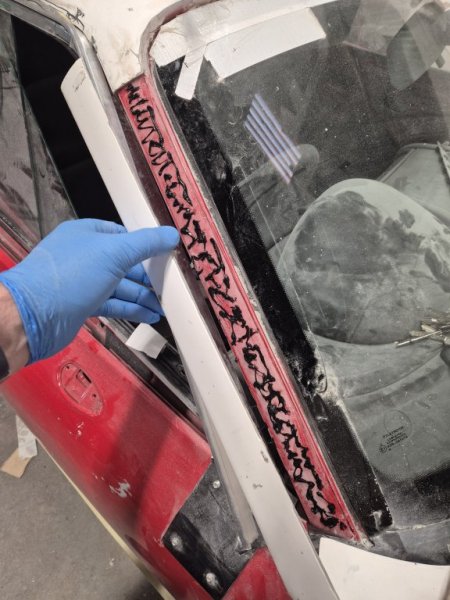
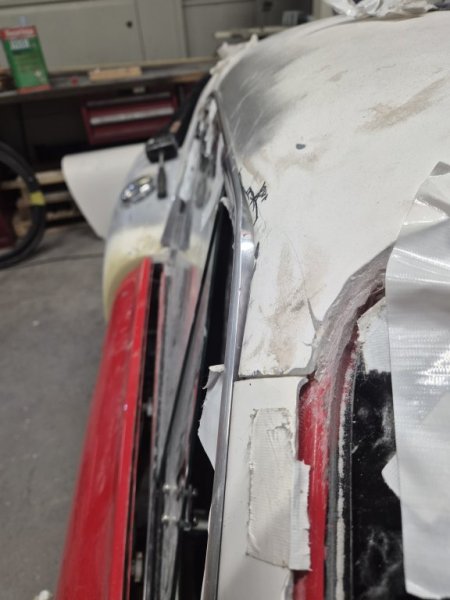
Last few days have been productive with making the rain channels. I'm using a technique recommended to me from another Coupe builder, with a length of aluminium coping that has a J shape to it.
I made a template of the window frame from OSB board screwed to a larger section of OSB board. I've then used smaller blocks of wood to secure it with a 3mm spacer with 3mm hardboard. Once fixed the aluminium is heated up with butane tourch so it's flexible enough to bend. It's then bent to the rough shape of the window profile. Once it's shaped to a good profile it's offered up to the window frame itself. I've then used a length of 3mm thick aluminium and fixed/bent that around the window frame to give the gap i want between the window and the rain channel. I've then heated up the aluminium again and bent it to fit the window frame itself small section at a time. Once happy it's positioned against the body and fits nicely. It needed some addional tweaking at there is a curve to the body that doesn't follow then window frame straight edge.
To get it to fit against the car body I've had to take quite a bit of fibreglass off the door opening at the reat so ive had to reinforce the edges with some addional fibreglass behind it all.
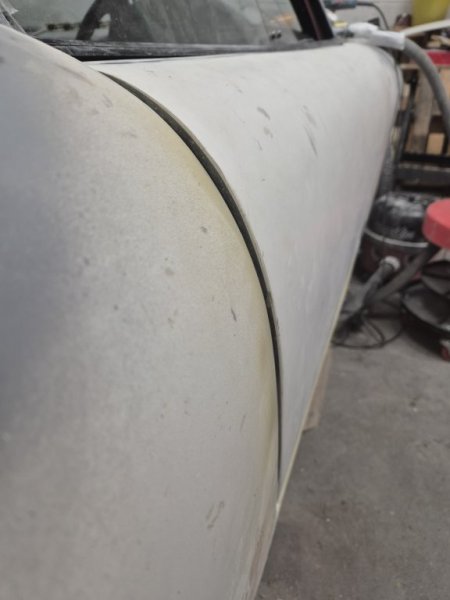
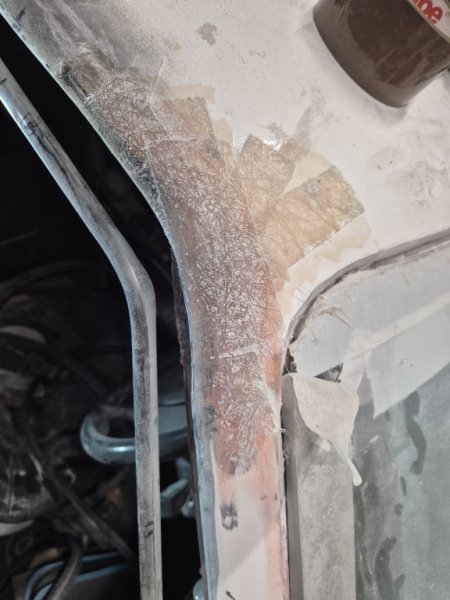
While it all sits nicely and will be fixed in place over the next few days using rubber rivet nuts, it's clear that the body / roof needs quite a bit of reworking over then top of the A pillar/roof edge. I've posted an image showing how far out the roof is. That's next weeks job!!
I made a template of the window frame from OSB board screwed to a larger section of OSB board. I've then used smaller blocks of wood to secure it with a 3mm spacer with 3mm hardboard. Once fixed the aluminium is heated up with butane tourch so it's flexible enough to bend. It's then bent to the rough shape of the window profile. Once it's shaped to a good profile it's offered up to the window frame itself. I've then used a length of 3mm thick aluminium and fixed/bent that around the window frame to give the gap i want between the window and the rain channel. I've then heated up the aluminium again and bent it to fit the window frame itself small section at a time. Once happy it's positioned against the body and fits nicely. It needed some addional tweaking at there is a curve to the body that doesn't follow then window frame straight edge.
To get it to fit against the car body I've had to take quite a bit of fibreglass off the door opening at the reat so ive had to reinforce the edges with some addional fibreglass behind it all.
While it all sits nicely and will be fixed in place over the next few days using rubber rivet nuts, it's clear that the body / roof needs quite a bit of reworking over then top of the A pillar/roof edge. I've posted an image showing how far out the roof is. That's next weeks job!!
Attachments
-
 112.9 KB Views: 40
 -
 67.7 KB Views: 41
 -
 122.6 KB Views: 42
 -
 103.6 KB Views: 39
 -
 59.7 KB Views: 41
 -
 78.4 KB Views: 41
 -
 165.5 KB Views: 38
 -
 106.3 KB Views: 37
 -
 182.3 KB Views: 34
 -
 153.3 KB Views: 35
I wish I had your commitment and skills. I am seriously running out of ideas with mine. I need to get back in the game, as it's booked in for (very expensive) paint in a few weeks!While it all sits nicely and will be fixed in place over the next few days using rubber rivet nuts, it's clear that the body / roof needs quite a bit of reworking over then top of the A pillar/roof edge. I've posted an image showing how far out the roof is. That's next weeks job!!
Been quite busy this fortnight. First task was to reduce the travel on the door latches so the door skins dont hit the front bonnet hinges. I used a large nut and a couple of washers before resetting in the door. This gives me enough travel to open the door but keeps the edge away from the bonnet hinges. Also removed the small metal lip on the body that catches the door
Attachments
-
 57.1 KB Views: 22
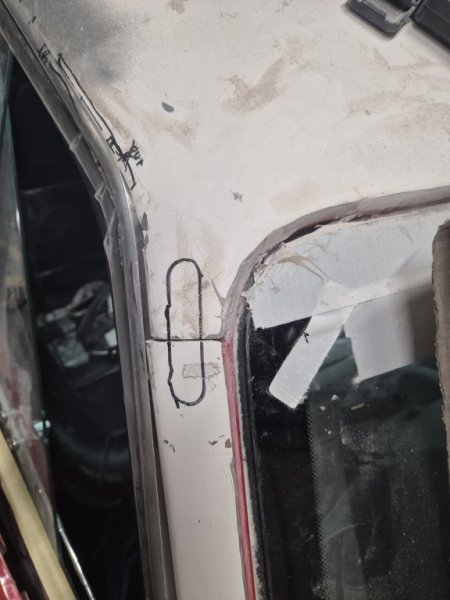
Door skins. I've decide to make the door skins removable as i dont trust that the chrome windows wont need rechroming in the future at some point and I dont want to cut the door out to get the off. So the door skins will be removable.
Ive used M4 rivet nuts around the edges of the door skin countersunk into the GRP panels. I want to actually make a feature or the screws so I have some nice stainless steel M4 bolts which screw through the door edges into the door skin. They will look good against the paintwork.
Once fitted ive filled up the gaps using fibreglass filler and then removed the panels to tidy up the edges. They now fit against the car door nicely either end. I will work up the final surface finish later. For now the one side sits nicely on the door. Im going to sit some L shaped chrome / rubber trim over the join too later.
Last edited:
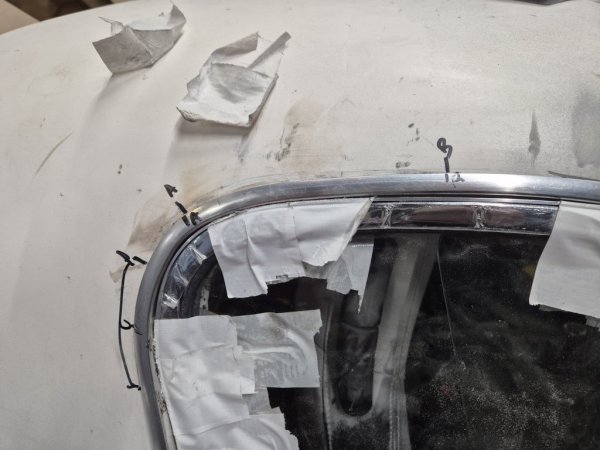
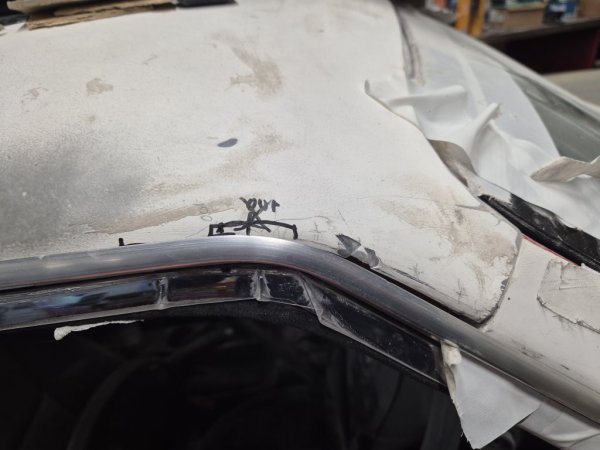
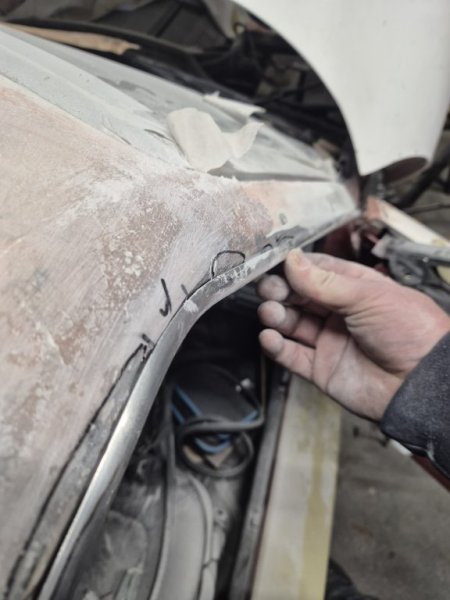
The rain chanel has been a nightmare but im getting there. I've heat bent the metal around the door opening with a constant gap between it and the window frame. But on doing this im needing to rework the A pillar to make the rain channel / body / window frames to all match and align. The body/roof line pulls away from the body too much so i need to bring the profile back to the rain channel. Still need to work this up later this week.
Ive also placed a stainless steel insert into to the A channel between the sections that join the A pillar and roof. This was advised by an article in Complete Kit Car to try and reduce chance of cracking at the joins. Ive also sanded back all joins so there is a gradient for maximising contact area for the fibreglassing.
The profile is better. Just need to finish and blend into the front roofline later.
Bonnet and boot also being worked on these past weeks to get even better look to them.
Attachments
-
 75.4 KB Views: 26
 -
 61.7 KB Views: 27
 -
 78.2 KB Views: 25
 -
 61 KB Views: 26
 -
 66.7 KB Views: 30
 -
 105.9 KB Views: 26
 -
 103.6 KB Views: 28
 -
 63.4 KB Views: 24
Would love to see more detail of your removable door skins. I really want to make mine removable too. I have a plan but I'm open to change.Door skins. I've decide to make the door skins removable as i dont trust that the chrome windows wont need rechroming in the future at some point and I dont want to cut the door out to get the off. So the door skins will be removable.
Ive used M4 rivet nuts around the edges of the door skin countersunk into the GRP panels. I want to actually make a feature or the screws so I have some nice stainless steel M4 bolts which screw through the door edges into the door skin. They will look good against the paintwork.
Once fitted ive filled up the gaps using fibreglass filler and then removed the panels to tidy up the edges. They now fit against the car door nicely either end. I will work up the final surface finish later. For now the one side sits nicely on the door. Im going to sit some L shaped chrome / rubber trim over the join too later.
View attachment 328525View attachment 328533View attachment 328537View attachment 328539View attachment 328547
I'm not sure what angle your first picture is looking at? Another picture from a distance so I can get a bit more perspective of what/where that is?
You'll make a feature of the screws? Where will these be visible from?
Thanks
Ill take some photos this evening. Im making them so that they could be removed, more than generally removable. I will add a little amount of sealant and spot bond at the edges, with some sealant too, so with a thin sharp blade I could break the bond spots.Would love to see more detail of your removable door skins. I really want to make mine removable too. I have a plan but I'm open to change.
I'm not sure what angle your first picture is looking at? Another picture from a distance so I can get a bit more perspective of what/where that is?
You'll make a feature of the screws? Where will these be visible from?
Thanks