Mainly the nuts and screw locations I'm interested in.Ill take some photos this evening. Im making them so that they could be removed, more than generally removable. I will add a little amount of sealant and spot bond at the edges, with some sealant too, so with a thin sharp blade I could break the bond spots.

Rebody Mittaws 250 SWB Coupe Build
- Thread starter mittaw
- Start date
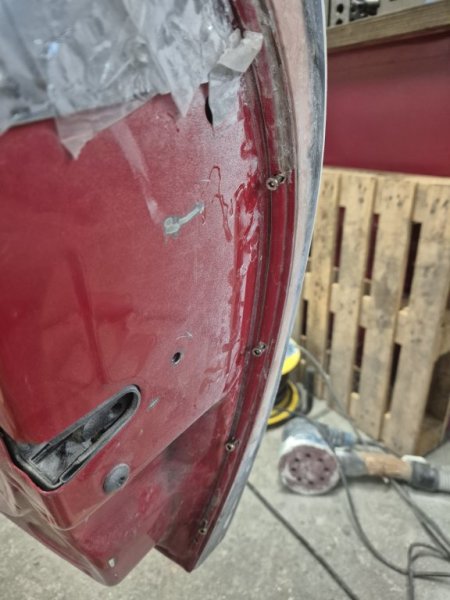
Here you go @Duncodin. The bolts go through the door edges as show here. I got the tip from another coupe builder. The rivet nuts are in the door as the image shows. Its rough on the inside at the moment but who cares as you can't see it. I have the rivet nuts countersunk more than shows here so they are flush.Mainly the nuts and screw locations I'm interested in.
The bolts look better than the image. When the doors are painted and the bolts polished up they will look good imo. I'm going tonrun some black or chrome L shape trim to cover the gap between door and skin. They gaps close more than shown here as just lose fitting for now
Attachments
-
 75.2 KB Views: 41
 -
 81.1 KB Views: 47
 -
 137.7 KB Views: 44
Thank you for those photos (door skin fixings). I never thought of doing it that way.
My original plan was to screw 'L' brackets to the steel door skin with captive nuts in the L bracket and screw the GRP door skin to the L bracket. In my case that would mean my screw head is in the door gap between the door and the B pillar where it's too tight for screw heads so the screw head would be recessed below the level of the GRP with a plastic cap over the screw head.
But I like your idea too so maybe a combination of both. It'll be a while before I get to that stage though but I will post pics on my build thread when I get there.
It takes a bit of jiggery pokery but it works. Good tip i learnt by doing it ia drill the holes through the door and skin for locating them rivet nuts. Make the rivet nut expand using the tool but not in the door, just on the tool. Then make the holes in the door skin a lot bigger than the squeezed rivet nut so its not tight in the hole.Thank you for those photos (door skin fixings). I never thought of doing it that way.
My original plan was to screw 'L' brackets to the steel door skin with captive nuts in the L bracket and screw the GRP door skin to the L bracket. In my case that would mean my screw head is in the door gap between the door and the B pillar where it's too tight for screw heads so the screw head would be recessed below the level of the GRP with a plastic cap over the screw head.
But I like your idea too so maybe a combination of both. It'll be a while before I get to that stage though but I will post pics on my build thread when I get there.
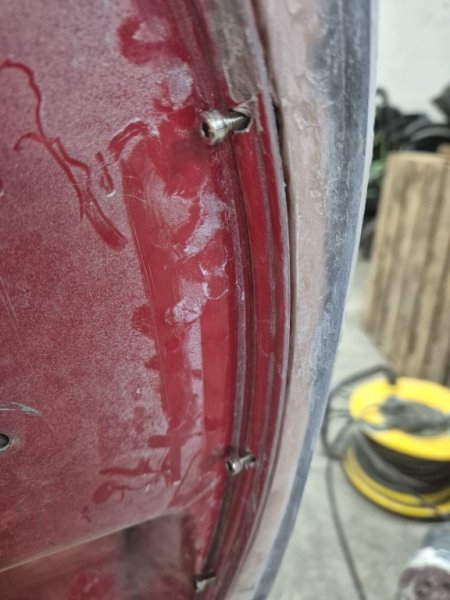
Then put the screws through the door and rivet nut on them like the image below. When all tight put fibreglass filler into the holes in the door and lift the skin onto the door panel and clamp it
Then after a short period 20 mins or so gentlely loosen the screw a bit so they doesn't set against the filler. Leave 24 hours to set.
I did it this way in the end after several hours previously trying to get screws to aligh with the rivet nuts in the doors to no success. Im going ro do the other door the way I finally did as above and it will save me hours.
Dxbolton
Zorg Guru (II)
I used the L bracket idea but they are underneath door and the heads fit between lower edge and door sill. Nothing on the side edges.My original plan was to screw 'L' brackets to the steel door skin with captive nuts in the L bracket and screw the GRP door skin to the L bracket.
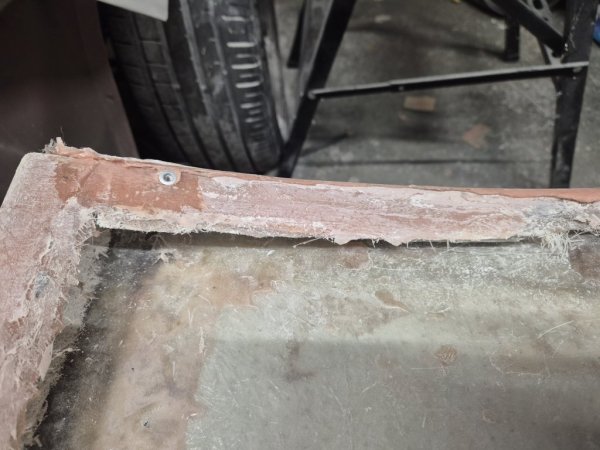
I've been working on the drivers door today. Having set the rain channel / A Pillar and door skin i can now level the door skin to the surrounding body panels. The door skin aligns reasonably well with the front bonnet section but sits quite proud of the rear body section. Ive adjusted the door latch so that the door sits as far into the body as possible but the outer skin is still too proud to the rear. I've therefore worked the rear body section up with fibreglass filler and set the panel gap between the rear section and door skin. It took a few hours to get the gap looking ok. I think the hours working on the bonnet panel gaps have paid off....
The boot has also had some attention too. Ive got quite a bit of work to do to get the boot to fit the body / symetry issues fixed, but its getting there
I hope to have both doors done for next weekend so I can get the window trim set / door handles located and their mechanisms working, plus the wing mirrors located. Big push for the doors done by end of Feb.
Attachments
-
 108.1 KB Views: 41
 -
 88.3 KB Views: 43
 -
 44.2 KB Views: 41
Drivers side door finished and now working on passenger door. The door needed quite a bit of work to fit to the body with the screw locations set in the door. The door still sits proud of the body similar to the drivers side so im going to have to work that to the door this week.
The boot needs quite a bit more work but ive used a couple of small bump stops on M6 screws rivet nutted to the bodywork to set the level and stop it hitting the body when closing. This appears to do the trick nicely.
Plan is to have it in first coat of primer soon.... testing some bling too
The boot needs quite a bit more work but ive used a couple of small bump stops on M6 screws rivet nutted to the bodywork to set the level and stop it hitting the body when closing. This appears to do the trick nicely.
Plan is to have it in first coat of primer soon.... testing some bling too
Attachments
-
 164.3 KB Views: 27
 -
 29.4 KB Views: 35
 -
 37.5 KB Views: 35
 -
 113.5 KB Views: 35
 -
 57 KB Views: 36
 -
 66.6 KB Views: 36
 -
 71.3 KB Views: 30
 -
 110.2 KB Views: 32
Rear end work today. The boot was very proud of the body when closed despite playing with the hinge locators.


Body worked up and guide coat primer on it. Needs quite a bit of work this week to level off with the boot but it feels better already

Also worked up the body to the passenger door. Will be leveled off latet this week but want to give it 24 hours to set better. Had a small school boy error by not opening the door after putting the filler in the door gap to set the panel gap and so the door set closed to the body......wont be doing that again after having to cut the door free...


Also needed to work up the bonnet to the door at the edges

Quite a bit of work to set this edge and door panel gap later this week.
Body worked up and guide coat primer on it. Needs quite a bit of work this week to level off with the boot but it feels better already
Also worked up the body to the passenger door. Will be leveled off latet this week but want to give it 24 hours to set better. Had a small school boy error by not opening the door after putting the filler in the door gap to set the panel gap and so the door set closed to the body......wont be doing that again after having to cut the door free...
Also needed to work up the bonnet to the door at the edges
Quite a bit of work to set this edge and door panel gap later this week.
This week has been more bodywork and re doing the aluminium rain channels...again. they were not sitting right enough for me.
But main achievement this week is the bespoke fibreglass brake vent covers. I wanted to make them interchangeable but that got too complicated so they are now fixed to the car.
I had already removed the stock tribute molded ones that come on the body and then made some 3d modelled samples to get the match right.

I then inverted the model on the final vent cover and printed that. Now i had a vent cover and inverted mold into which it sat.
I wrapped the mold and the cover in parcel tape because as much as I use mold release wax the fibreglass will stick to the rough 3d printed parts i reckoned.

I then covered both parts in mold release wax. I didn't use a gel coat first as the final product was going to still need a bit of working to the car.
I then used fibreglass strips in the mold first and then pressed the vent section into it to help form/keep the profile


What came out was a little rough but that was expected. When offered up to the car it needed a little re trimming and adjusting to sit right


Then with a little fibreglass filler and shaping to the body it sat comfortably. A little bit moreo working and shaping, and it's starting to get there.


Just now three more to make.
Ive kept the style simple, not reflective of any particular style. I like the simplicity of the shape
But main achievement this week is the bespoke fibreglass brake vent covers. I wanted to make them interchangeable but that got too complicated so they are now fixed to the car.
I had already removed the stock tribute molded ones that come on the body and then made some 3d modelled samples to get the match right.
I then inverted the model on the final vent cover and printed that. Now i had a vent cover and inverted mold into which it sat.
I wrapped the mold and the cover in parcel tape because as much as I use mold release wax the fibreglass will stick to the rough 3d printed parts i reckoned.
I then covered both parts in mold release wax. I didn't use a gel coat first as the final product was going to still need a bit of working to the car.
I then used fibreglass strips in the mold first and then pressed the vent section into it to help form/keep the profile
What came out was a little rough but that was expected. When offered up to the car it needed a little re trimming and adjusting to sit right
Then with a little fibreglass filler and shaping to the body it sat comfortably. A little bit moreo working and shaping, and it's starting to get there.
Just now three more to make.
Ive kept the style simple, not reflective of any particular style. I like the simplicity of the shape
Been a busy few weeks. Getting ready for primer this week.

All lights at the front wired up and ready to go. Still got the rear to do

Chrome rain channels back from the chromers and ready fitting checked.


Hopefully primer on this week to prep for the bodyshop.

All lights at the front wired up and ready to go. Still got the rear to do
Chrome rain channels back from the chromers and ready fitting checked.
Hopefully primer on this week to prep for the bodyshop.
Looking forward to seeing how this turns out, as you obviously have much more skill and dedication than me.
Why are you doing the primer if you are sending it to paint?
One thing I noticed.....too late now but it looks like you have been using Isopon fibreglass filler (pink)? I have used that and it is horrible stuff.
I have recently found a much better fibreglass filler (by accident). It is so much easier to use and is bright blue (can't remember the name but I will look if it helps).
Like the chromed rain channels. Spot-on!
Tony.
Tony.
I'm just jealous of all that space you've got. 
I've got a garage but me and the car have to take it in turns to sit inside.
I've got a garage but me and the car have to take it in turns to sit inside.